
Draw your floor plan
Every drawing tool, placing and editing booths, layers, snapping and keyboard shortcuts.
The tool rail on the left of the map editor holds every drawing tool. Hover a tool to see its name and keyboard shortcut. Tools that share a tile show a small corner arrow: select it to see the others.
A tool stays armed after you place something, so the next click places another. Press Escape to go back to Select.
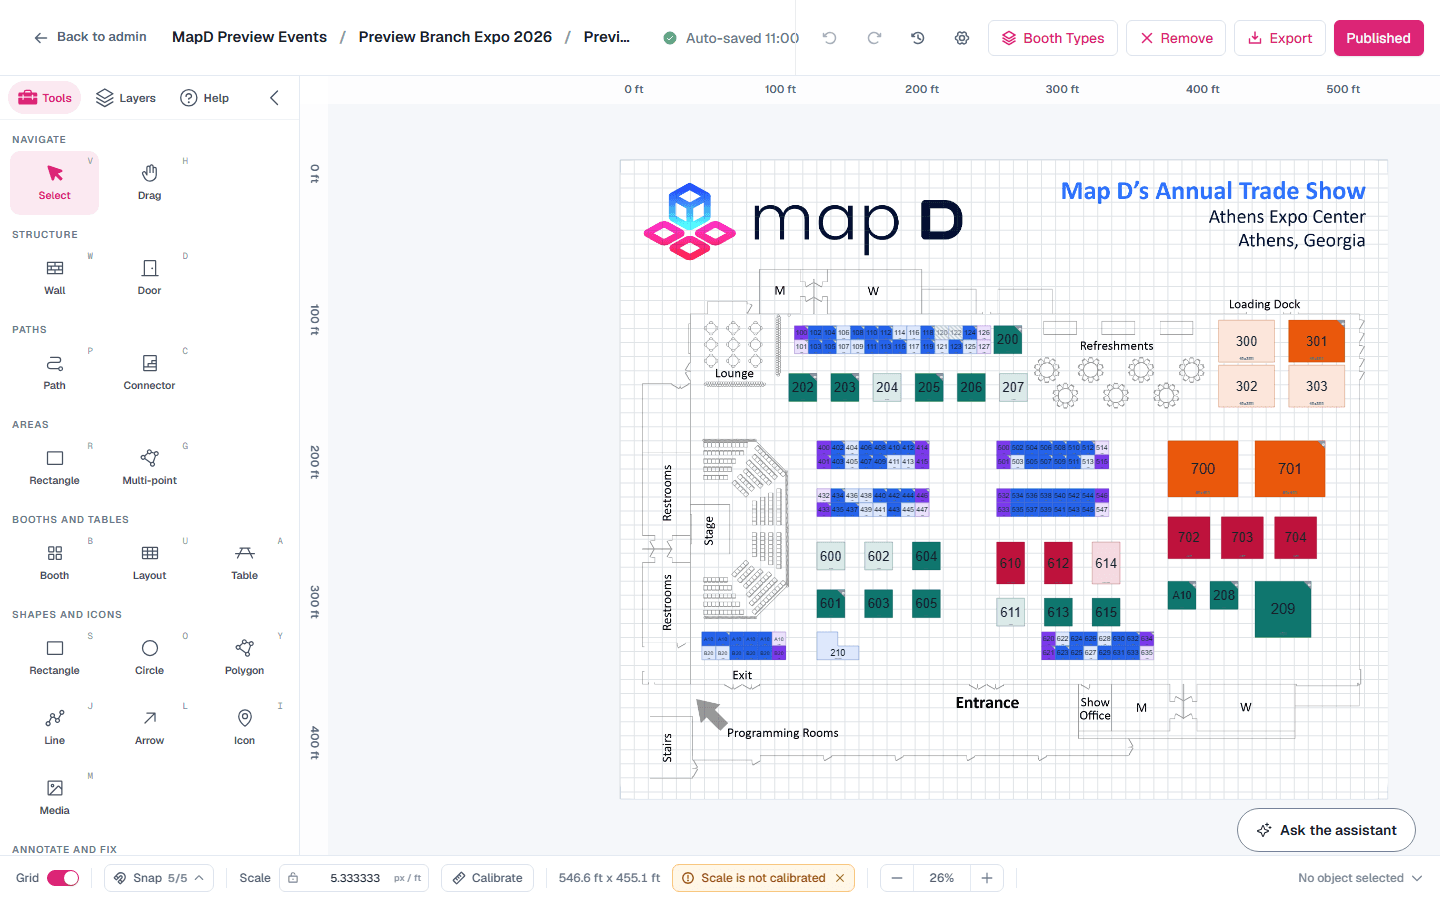
The tools
| Group | Tools (shortcut) | How to use them |
|---|---|---|
| Navigate | Select (V), Drag (H) | Select objects, or pan around the map. |
| Structure | Wall (W), Door (D) | Click a chain of points for a wall and double-click to finish. Click a wall to add a single, double or open-passage door. |
| Paths | Path (P), Connector (C) | Draw walking routes for attendee wayfinding. Connectors link floors by stairs, elevator or escalator. |
| Areas | Rectangle (R), Multi-point (G) | Mark zones such as a food court, stage or registration. Drag a box, or click the corners. |
| Booths and tables | Booth (B), Layout (U), Table (A) | Click to place a booth or table. Layout fills a region with booths. See Lay out and number booths. |
| Shapes and icons | Rectangle (S), Circle (O), Polygon (Y), Line (J), Arrow (L), Icon (I), Media (M) | Add shapes, icons such as restrooms and exits, and your own images and logos. |
| Annotate and fix | Text (T), Booth numbering (N), Cleanup (E) | Add labels, number booths in order, and paint over marks on the floor plan image. |
Double-click finishes a multi-point drawing. Escape discards it. While drawing, you can type an exact length.
Place booths
Select Booth (B), pick a booth type from the palette, and click the map. Choose No type for a plain 10 ft booth you type later.
Select a booth to edit it in the panel on the right:
- Booth: number, title, shape (square, L shape or round), size, rotation, booth type, exhibitors and a description of up to 250 characters. Split Booth divides one booth into a grid of smaller ones. A round booth is a round table you sell like any other booth. Set Chairs to draw up to 16 chairs around it; they sit just outside the booth's size.
- Exhibitor: pick the company on the booth. Several companies can share one booth: select Add another exhibitor for each of them, and the X beside a name to take it off the booth. On the online floor plan, pointing at a shared booth lists everyone on it. If two of your maps both have a booth with the same number, the exhibitor gets only the booth you assign here.
- Dimensions Text: your own wording for the booth's size, such as "20 feet by 20 feet", shown instead of the measured width and depth. Leave it empty to show the measurement.
- Label Size: make the booth's number and title smaller or larger, from 50% to 200%. A label never grows past what fits in the booth.
- Red X: draw a red X over the booth. It is a drawing only: the booth still sells unless you also make it Reserved or not Purchasable.
- Pricing: set a Manual Booth Price, or leave it empty to use the booth type's price.
- Purchase Settings: whether the booth is Purchasable, Reserved to hold it back from buyers, and a Booth code to keep it for one exhibitor. See Keep a booth for an exhibitor.
To edit several booths at once, select them together. You can change their booth type, purchasability, shape, size and rotation, and use Align and Distribute to line them up. Turn on Reserved to hold them all back from buyers, or Red X to draw a red X over them. Type a Booth code and select Apply to put the same code on all of them, or leave it empty and select Clear codes. Clear booth numbers removes their numbers so you can number them again (a booth with no number shows as unavailable on the online floor plan until it has one), and Remove deletes them.
Layers
Select Layers at the top of the tool rail to hide, dim or lock layers such as the floor plan image, structure, booths, icons, text and wayfinding paths. Locking a layer stops accidental edits while you work on another.
Handy shortcuts
| Action | Shortcut |
|---|---|
| Undo / Redo | Ctrl+Z / Ctrl+Shift+Z |
| Copy, paste, duplicate | Ctrl+C, Ctrl+V, Ctrl+D |
| Select all | Ctrl+A |
| Nudge | Arrow keys for 1 ft, Shift for 5 ft, Shift+Ctrl for 10 ft |
| Bring forward / send backward | Ctrl+] / Ctrl+[ |
| Pan | Hold Space and drag |
| Suspend snapping | Hold Ctrl while dragging |
On a Mac, use Cmd instead of Ctrl. Select Help at the top of the tool rail for the full list.
Snapping and the grid
The footer has a Grid toggle and a Snap menu where you choose what objects snap to: grid, points, edges, alignment and 15° angles. Snap settings are saved in your browser, not the map. Turning the grid on or off is saved for the show. Maps moved from your previous platform start with the grid off, since their floor plan images already show the layout; turn Grid on whenever you want it.
Still need help?
Contact your Map D account team. Include your show name and, if something looks wrong, a screenshot of the page.
Last updated September 30, 2026